Friday, January 9, 2015

How to Make a Domain User a Local Administrator for all PCs

Step 1 : Creating a Security Group

First you need to create a security group called Local Admin
  • Log onto a Domain Controller, open Active Directory Users and Computers (dsa.msc)
  • Create a security Group name it Local Admin. From Menu Select Action | New | Group

  • Name the group as Local Admin.

  • Add the Help Desk members to Local Admin group. I will add two users say Tom and Bob.

Step 2: Create Group Policy.
Next you need to create a group policy called “Local Admin GPO”
  • Open Group Policy Management Console ( gpmc.msc )
  • Right click on Group Policy Objects and select  New. 

  • Type the name of the policy "Local Admin GPO"

Step 3: Configure the policy to add the “Local Admin” group as Administrators

Here you will add the Local Admin group to the Local Admin GPO policy and put them in the groups you wish them to use.
  • Right click “Local Admin GPO” Policy then select Edit.
  

  • Expand Computer configuration\Policies\Windows Settings\Security Settings\Restricted Groups
  • In the Left pane on Restricted Groups, Right Click and select “Add Group


  • In the Add Group dialog boxselect browse and type Local Admin and then clickCheck Names

  • Click OK twice to close the dialog box.

  • Click Add under “This group is a member of:”
  •  Add the “Administrators” Group.
  •  Add “Remote Desktop Users”
  •  Click OK twice
 
NOTE# When adding groups, you can add whatever you want, the GPO will match the group on the system, if you type “Admins” it will match a local group called Admins if it exists and put “Local Admin” in that group.

Step 4: Linking GPO

  • In Group policy management console, right click on the domain or the OU and select Link an Existing GPO

  • Select the Local Admin GPO
Step 5: Testing GPOs

Log on to a PC which is join to the domain and then run gpupdate /force and check the local administrators group. You should see Local Admin in that group now. Make sure all PCs you want to access should be move to an OU and properly link above GPO. Tom and Bob domain users can now access all PCs remotely as a local administrator.


Backup and restore on windows server 2008

Windows server backup is a feature and is not installed by default. Before we can perform backup we have to install the feature.
Either go to
Start/administrative tools/server manager
Features/add features/windows server backup

Or

C:\>servermanagercmd -install backup-features

System state backup and restore

We can only perform a system state backup using the WBADMIN.EXE command-line tool.

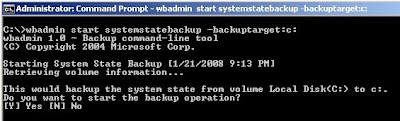
C:\>wbadmin start systemstatebackup -backuptarget:e:

Backing up a server from command line

C:\>wbadmin start backup -include:c:,d: -backuptarget:e:

To backup all critical system volumes

C:\>wbadmin start backup -allcritical -backuptarget:e:

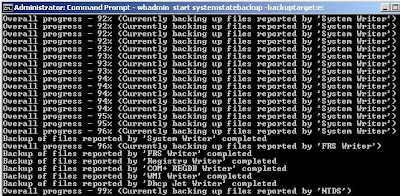
After starting backup wbadmin show the progress of the backup. If we close the window the backup will continue in the background. Can reconnect wbadmin to a running backup

C:\>wbadmin get status

To terminate

C:\>wbadmin stop job

Scheduling backup from command line

C:\>wbadmin enable backup -addtarget:e: -include:c:,d: -schedule:06:00,12:00,18:00

This command would backup c: and d: drives to e: drive three times a day, at 06:00 AM,12:00 PM,06:00 PM

Disable all scheduled backups

C:\>wbadmin disable backup

To restore

C:\>wbadmin start systemstaterecovery -version:12/03/2015-18:36

Thursday, January 8, 2015

Reset Directory Service Restore Mode (DSRM) Password

Option 1: Reset DSRM Password with Ntdsutil
  1. On your machine, select Run from the Start menu, type ntdsutil and click OK.
    Ntdsutil
  2. At the Ntdsutil command prompt, type set dsrm password.
  3. At the DSRM command prompt, run the Reset Password command, passing the name of the server on which to change the password, or use the null argument to specify the local machine. For example, to reset the password on server thanos, enter the following command:
    reset password on server thanos
    To reset the password on the local machine, specify null as the server name:
    reset password on server null
  4. You'll be prompted twice to enter the new password.
  5. Type q to exit the DSRM command prompt.
    reset DSRM password
  6. At the Ntdsutil command prompt, type q to exit.
You can now use the local administrator account to log on to the recovery console or Directory Services Restore Mode using the new password. However, you can only use the Ntdsutil utility to reset DSRM password while logging into domain controller. If you also forgot domain administrator password, then you need to use the method below to change your forgotten DSRM password.

Option 2: Reset DSRM Password with PCUnlocker Utility
  1. You need an alternative computer with internet access to download the PCUnlocker utility.
  2. Unzip the download file, you'll get the pcunlocker.iso file.
  3. Burn the ISO image file to a CD or USB thumb drive using the ISO2Disc tool.
  4. Insert your newly burned CD/USB drive into the domain controller and power it up. Set the computer to boot from CD/USB by going into BIOS.
  5. Once you've gotten it to boot from the CD/USB, the computer will load the system inside the CD/USB drive and launch the PCUnlocker utility.
    Reset Windows Password
  6. Click on the Reset Local Admin/User Password option, you'll see the Windows SAM database and local user accounts.
  7. Choose the local administrator account and click on the Reset Password button.
  8. It will remove your forgotten DSRM password immediately.
Additionally, you can also use PCUnlocker utility to reset forgotten domain administrator password for Windows 2000 / 2003 / 2008 / 2012 Active Directory domain controllers.

The Administrator password that you use when you start Recovery Console or when you press F8 to start Directory Service Restore Mode is stored in the registry-based Security Accounts Manager (SAM) on the local computer. The SAM is located in the %SystemRoot%\System32\Config folder. The SAM-based account and password are computer specific and they are not replicated to other domain controllers in the domain. 

For ease of administration of domain controllers or for additional security measures, you can change the Administrator password for the local SAM. To change the local Administrator password that you use when you start Recovery Console or when you start Directory Service Restore Mode, use one of the following methods.

Method 1

If Windows 2000 Service Pack 2 or later is installed on your computer, you can use the Setpwd.exe utility to change the SAM-based Administrator password. To do this:
  1. Log on to the computer as the administrator or a user who is a member of the Administrators group.
  2. At a command prompt, change to the %SystemRoot%\System32 folder.
  3. To change the local SAM-based Administrator password, type setpwd, and then press ENTER. 

    To change the SAM-based Administrator password on a remote domain controller, type the following command at a command prompt, and then press ENTER
    setpwd /s:servername
    where servername is the name of the remote domain controller.
  4. When you are prompted to type the password for the Directory Service Restore Mode Administrator account, type the new password that you want to use. 

    NOTE: If you make a mistake, repeat these steps to run setpwd again.
For additional information about the Setpwd.exe utility, click the article number below to view the article in the Microsoft Knowledge Base:
271641 The Configure Your Server Wizard Sets Blank Recovery Password

Method 2

  1. Log on to the computer as the administrator or a user who is a member of the Administrators group.
  2. Shut down the domain controller on which you want to change the password.
  3. Restart the computer. When the selection menu screen is displayed during restar, press F8 to view advanced startup options.
  4. Click the Directory Service Restore Mode option.
  5. After you log on, use one of the following methods to change the local Administrator password:
    • At a command prompt, type the following command:
      net user administrator *
    • Use the Local User and Groups snap-in (Lusrmgr.msc) to change the Administrator password.
  6. Shut down and restart the computer.
You can now use the Administrator account to log on to Recovery Console or Directory Services Restore Mode using the new password. 

For additional information about how to secure the local SAM, click the article number below to view the article in the Microsoft Knowledge Base:
223301 Protection of the Administrator Account in the Offline SAM

NTDSUTIL Password Pull
Beginning with hotfix KB961320 on Windows Server 2008, you now have the option to synchronize the DSRM password on a DC with a specific domain account. You must do every time the password is changed; it does not create an automatic sync partnership.
1. Create a standard domain user account and set it with a complex password. It does not need to be a member of any special groups or the Domain Admins group.
image
2. Install the hotfix on your DC and restart.
3. Logon to the DC normally.
4. In an elevated CMD prompt where you have logged on as a Domain Admin, run:
NTDSUTIL SET DSRM PASSWORD SYNC FROM DOMAIN ACCOUNT  Q
So for example (using NTDSUTIL’s ability to pass in all parameters on a single command-line):
image
Note how there is no need to provide the actual password being used, or provide the old password. This feature will also be included in Service Pack 2 for Win2008.
Group Policy Preference Automation of NTDSUTIL
So what if we want to automate this NTDSUTIL command so that is run via a scheduled task? This is easily done using Group Policy Preferences.
Note: Before you get too excited that I’ve missed something – no, GPP Local User password does not work with the DSRM passwords on domain controllers. You cannot use it to push a new password to the local administrator on DC’s; it only works only on member computers. Trust me, I’ve tried.
The beauty of this solution is that there is no password stored anywhere except in Active Directory itself and the system effectively self maintains – the only administrator intervention needed is to periodically change the special user’s password, and to make sure the scheduled task is working on the DC’s. The same way you should be checking to make sure those backups will actually function for a restore if you ever need to use this password.
So let’s set this up:
1. Start GPMC on a Windows Server 2008 or Windows Vista computer running RSAT.
2. Create and link a new policy on the Domain Controllers OU (you are doing all this in a test domain first, right?).
image
3. Create the GPP Scheduled task settings.
image
Note here that I have set:
A) Action of ‘Update’ (this will create the task if it does not exist).
B) Run command of the built-in GPP variable for %SystemDir% to specify the System32 directory, along with the ntdsutil.exe to be called.
C) The command line exactly as it would be done by hand with ntdsutil, including the quotation marks:
“SET DSRM PASSWORD” “SYNC FROM DOMAIN ACCOUNT DsrmUser” Q Q
D) The task is Enabled with a checkbox so that it will run, not just be created.
image
E) Then I have set this to run as a daily task at 9AM (it’s fairly likely that the DC will be running at that point). I could also run this hourly, weekly, etc – whatever I want.
4. After having created the policy and letting it apply to DC’s, I now see it is working by examining the scheduled tasks on one of my domain controllers. There it is (as well as another one I added to run every night too – can’t be too careful):
image
5. Once the right time has come and gone, I boot a DC into DS Repair mode and check – sure enough, my new password has taken affect automagically.


System State Backup on windows 2008 server

To take normal backup you have to add windows features

1, Start/Programs/Administrative Tools/server manager
2, Features/Add Features/Windows Server Backup
3, Click next and finish


To take system state backup on windows 2008 server

1, Run command prompt
2, use command tool 'wbadmin'
    eg: C:\>WBADMIN START SYSTEMSTATEBACKUP -backuptarget:E:
    E: is the target location of the backup file
3, type Y to confirm


To restore the system state

1, Run command prompt
2, get the version of the wbadmin
    Eg: wbadmin get version


3, wbadmin start systemstate recovery -version: -showsummary [-backupTarget:     { | }] [-machine:] [-recoveryTarget:] [-authsysvol] [-autoReboot] [-quiet]

   Eg1: WBADMIN START SYSTEMSTATERECOVERY-VERSION:01/08/2015-08:34

   Eg2: wbadmin start systemstaterecovery -version:04/30/2005-09:00 -backupTarget:\\servername\share -      machine:server01


Monday, November 10, 2014

IP address from command line

The 'netsh' command is a very useful command.

Create a batch file with different ip settings. And we can change ip addresses, gateway and DNS with a single click.

Syntax:
Netsh [-a AliasFile] [-c context] [-r RemoteComputer] [{NetshCommand¦-f ScriptFile}]

-a : Returns you to the netsh prompt after running AliasFile.
AliasFile : specifies the name of the text file that contains one or  more netsh commands.
-c : specifies the netsh context.

Following are the available netsh contexts.

AAAA :

DHCP : administers DHCP servers and provides an equivalent alternative to console based management.

Diag :

Interface : configures the TCP/IP protocol

RAS :

Routing :

WINS :

-r : configures  a remote computer
-f : exits netsh after running the script.
ScriptFile : specifies the script that you want to run.

Eg:
netsh interface "local area network" set address static 192.168.0.100 255.255.255.0 192.168.0.1 1

We can use 'add' other than 'set'

You can use like a tool
Run command prompt

NETSH -> will go to netsh prompt
NETSH DUMP : dump all the network information as a script to the screen. You can sent to file using
NETSH DUMP> netshDump.txt
SET ADDRESS NAME="Local Area Connection" source=dhcp
Set the interface "local area connection " to DHCP
SET ADDRESS LOCAL STATIC 10.0.0.8 255.0.0.0 10.0.0.1 1
NETSH INTERFACE IP SHOW CONFIG
Set the interface to static

Eg:

1. Static ip
netsh interface ip set address name="Local Area Connection" static 192.168.1.10 255.255.255.0 192.168.1.1 1

2. Obtain ip automatic
netsh interface ip set address name="Local Area Connection" dhcp

3. Primary DNS
netsh interface ip set dns name="Local Area Connection" static 8.8.8.8

4. Alternative DNS
netsh interface ip add dns name="Local Area Connection" static 4.4.8.8 index=2

5. DNS from dhcp server
netsh interface ip set dnsservers name="Local Area Connection" source=dhcp

Monday, August 11, 2014

Windows Drive Not Ready Exception Error

It is usually seen on Windows XP, Vista and 7 machines


Solution:

1. Click Start, and type “regedit” to open registry editor.Press Enter.

2. In the Registry Editor, on the left pane, navigate to the following key by expanding the plus sign (+):

HKEY_LOCAL_MACHINE\ SYSTEM\ CurrentControlSet\Control\Windows  

3. Double-click on the key ErrorMode and set the data value to 2.

4.Restart the computer.


Notes: 
Always create a backup of the registry before editing. In case we need to undo the modification, we can double click it to restore the registry key
Right click on "Windows" (step 2) , click "Export", and then save it to the any drive.

Saturday, April 19, 2014

Windows 7 User Profile Issues


"The User Profile Service failed the logon” error message


In Windows 7 it is common to get this error. The simplest method is the following.

1. Log on with another administrative account.
2. Delete C:\Users\%username%
3. Delete C:\Users\TEMP
4. Delete the registry key matching your SID from
    "HKEY_LOCAL_MACHINE\SOFTWARE\Microsoft\WindowsNT\CurrentVersion\ProfileList".
5. Check the value "ProfileImagePath" to make sure you pick your own profile.Restart once again and then you're done!

Here is the step by step procedure

If there is another administrator account that you can log into, then jump to step 7 after logging into that account.
However, if you can't get to any accounts at all, then start at step 1.

  1. Restart your computer and hit F8 multiples times until you see a menu-like screen, if you see the Windows splash screen then repeat this step
  2. Highlight and hit enter on Safe Mode with Command Prompt. Try logging in there. If it still doesn't work, then go to step 17
  3. If you are able to login, once a command prompt pops up, type: net user administrator password /active:yes (you can specify whatever password you want for the administrator account.)
  4. If you get a message saying "The command completed successfully", then restart your computer by typing: shutdown -r
  5. Boot up again pressing F8, but this time choose just Safe Mode.
  6. You will be able to login as Administrator with the password you set in Step 3
  7. Hit (windows logo)+R 
  8. Type regedit
  9. Once the registry editor opens up, look for HKEY_LOCAL_MACHINE\SOFTWARE\Microsoft\Windows NT\CurrentVersion\ProfileList
  10. In the left pane, find the one that starts with S-1-5..... and ends with .BAK; if you don't find one, skip to step 15
  11. Right click it and click Rename, then change the .BAK to .BK
  12. Rename the one with the same numbering but without the .BAK and add .BAK at the end
  13. Right click the one that you renamed to .BK and click. Rename, delete the .BK
  14. Eventually, you have switched the .BAK from the end of the second entry to the first. That should probably fix your problem.
  15. If you didn't find a .BAK then try this: Open Windows Explorer to C:\Users\Default\AppData\Local\Application Data
  16. If you find another Application Data below the one you're on, then delete it. That should probably also fix your problem.
  17. If you can't login in Safe Mode, then reboot and hit F8 until you see the menu again, then hit enter highlighting Repair Your Computer
  18. Wait until all Windows Files finish loading, then hit Next when it asks keyboard language.
  19. Try logging in here also, choose your user from the dropdown menu, and type the password, then jump to step 23
  20. If that still doesn't work, then if you have your Windows Installation CD still, put it in and restart your computer.
  21. Hit F12 until you see a menu of boot options, choose Boot from CD
  22. Choose keyboard language then hit next. Find Repair Your Computer from a little below the center left.
  23. Choose Open Command Prompt and type: net user administrator password /active:yes (here again you can specify a password)
  24. Close the command prompt and click Restart and jump to step 5

To disable the administrator account, type this in an elevated command prompt: 
net user administrator /active:no